A Raspberry Pi can be used for many things - including running a Kubernetes cluster. This can be a fun way to learn more about Kubernetes as well as provide you with your own resources to run various containers. As an example, I use my cluster to run things like Kafka for my open source work. In this post I will describe how to set up a cluster of Pi devices to run Kubernetes 1.18.x.
Setup
Here is a picture of my setup inside my rack cabinet:
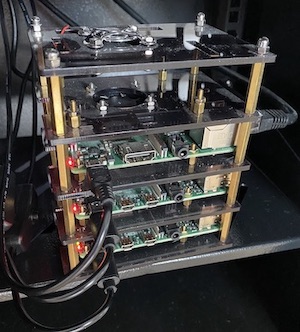
The Pi rack has a total of 4 Pi devices at the time of writing (last one wasn’t installed on the picture :) - 3x Pi 4 model B and 1x Pi 3 model B. The version 3 is used exclusively as a Pi Hole today and is not part of my cluster anymore. The cluster in this post will consist of 1 master (I am aware this word is controversial, but for the time being, this is the official k8s terminology) and 2 workers.
Details of devices:
- Raspberry Pi 4 model 4B (4GB)
- dezen USB C Charger (3A)
- Kingston Canvas Select microSDHC - 16GB
- MakerFun Pi Rack Case (includes cooling fans and heatsinks)
Prerequisites
Before installing Kubernetes, you should have your Pi devices up and running. Install Raspberry Pi OS based on the official documentation (I use the lite version) (download). At the time of writing, “Buster” is the current release.
Make sure that all devices have a static IP to avoid any issues later. Either configure each device with a static IP (link) or give them a static lease from your router (I do this).
Install Kubernetes
Before we get to the actual cluster, we need to prepare Raspian with some configurations.
First, configure the devices with hostnames that make them recognizable. Type sudo raspi-config to enter the configuration tool. Enter 2 Network Options, then 1 Hostname and enter your desired hostname on each device. My chosen hostnames are (explanation):
- endurancemaster01
- enduranceworker01
- enduranceworker02
- enduranceworker03
Next are some configurations required for Kubernetes. Most of these instructions come from the official kubeadm installation page but I highlight some changes you need for this to work on Pis. You need to do this on all the nodes.
Disable Swap
This is an official requirement for Kubernetes to run:
sudo dphys-swapfile swapoff
sudo dphys-swapfile uninstall
sudo update-rc.d dphys-swapfile remove
sudo systemctl disable dphys-swapfile.service
Configure iptables
# Load br_netfilter module first - not enabled by default
sudo modprobe br_netfilter

cat <<EOF | sudo tee /etc/sysctl.d/k8s.conf
net.bridge.bridge-nf-call-ip6tables = 1
net.bridge.bridge-nf-call-iptables = 1
EOF
sudo sysctl --system
Important: You likely still need to switch iptables to legacy on Pis even though this is not mentioned in the documentation (this was a step in earlier versions of Kubernetes):
sudo update-alternatives --set iptables /usr/sbin/iptables-legacy
sudo update-alternatives --set ip6tables /usr/sbin/ip6tables-legacy
sudo update-alternatives --set arptables /usr/sbin/arptables-legacy
sudo update-alternatives --set ebtables /usr/sbin/ebtables-legacy
Without this CoreDNS will not work properly and containers will fail to resolve any hostnames.
Install Docker as Container Runtime
curl -sSL get.docker.com | sh && \
sudo usermod pi -aG docker
Install kubeadm, kubelet and kubectl
sudo apt-get update && sudo apt-get install -y apt-transport-https curl
curl -s https://packages.cloud.google.com/apt/doc/apt-key.gpg | sudo apt-key add -
cat <<EOF | sudo tee /etc/apt/sources.list.d/kubernetes.list
deb https://apt.kubernetes.io/ kubernetes-xenial main
EOF
sudo apt-get update
sudo apt-get install -y kubelet kubeadm kubectl
sudo apt-mark hold kubelet kubeadm kubectl
Install CNI Plugins
Important: if you take the next commands from the official guide - make sure to replace “amd64” in the paths with “arm” to get the right bits.
CNI_VERSION="v0.8.2"
sudo mkdir -p /opt/cni/bin
curl -L "https://github.com/containernetworking/plugins/releases/download/${CNI_VERSION}/cni-plugins-linux-arm-${CNI_VERSION}.tgz" | sudo tar -C /opt/cni/bin -xz

DOWNLOAD_DIR=/usr/local/bin
sudo mkdir -p $DOWNLOAD_DIR

CRICTL_VERSION="v1.17.0"
curl -L "https://github.com/kubernetes-sigs/cri-tools/releases/download/${CRICTL_VERSION}/crictl-${CRICTL_VERSION}-linux-arm.tar.gz" | sudo tar -C $DOWNLOAD_DIR -xz

RELEASE="$(curl -sSL https://dl.k8s.io/release/stable.txt)"
cd $DOWNLOAD_DIR
sudo curl -L --remote-name-all https://storage.googleapis.com/kubernetes-release/release/${RELEASE}/bin/linux/arm/{kubeadm,kubelet,kubectl}
sudo chmod +x {kubeadm,kubelet,kubectl}

RELEASE_VERSION="v0.2.7"
curl -sSL "https://raw.githubusercontent.com/kubernetes/release/${RELEASE_VERSION}/cmd/kubepkg/templates/latest/deb/kubelet/lib/systemd/system/kubelet.service" | sed "s:/usr/bin:${DOWNLOAD_DIR}:g" | sudo tee /etc/systemd/system/kubelet.service
sudo mkdir -p /etc/systemd/system/kubelet.service.d
curl -sSL "https://raw.githubusercontent.com/kubernetes/release/${RELEASE_VERSION}/cmd/kubepkg/templates/latest/deb/kubeadm/10-kubeadm.conf" | sed "s:/usr/bin:${DOWNLOAD_DIR}:g" | sudo tee /etc/systemd/system/kubelet.service.d/10-kubeadm.conf
Start kubelet
On a fresh Raspberry Pi OS install, making systemd changes requires setting a root password. Before we can start the kubelet service, set a root password with passwd:
pi@endurancemaster01:~ $ sudo su
root@endurancemaster01:/home/pi passwd
Then start the kubelet service:
systemctl enable --now kubelet
Start the Cluster
With the previous steps done on all the pis, it is time to start the cluster. There is not alot unique for Raspberry Pi here, so these steps are pretty much just one to one with the original documentation (see Creating a single control-plane cluster with kubeadm).
Initialize the control-pane node with (make sure to read the docs if you need a specific pod network range or a non-host specific control-pane endpoint - for this cluster I don’t need it):
sudo kubeadm init
After a bit of work we should now get confirmation that kube is running including join command for the other nodes.
Set up the kubectl with context for the new cluster also part of the output:
mkdir -p $HOME/.kube
sudo cp -i /etc/kubernetes/admin.conf $HOME/.kube/config
sudo chown $(id -u):$(id -g) $HOME/.kube/config
You should also copy this to your local machine and have kubectl handy. We will need this to access the dashboard later (see docs).
On each node, run the join command from the output:
sudo kubeadm join <master>:6443 --token <token> --discovery-token-ca-cert-hash sha256:<hash>
Shortly after, all nodes should now be visible in the cluster (but not yet ready):
pi@endurancemaster01:~/ $ kubectl get node
NAME                STATUS      ROLES    AGE   VERSION
endurancemaster01   NotReady    master   15m   v1.18.5
enduranceworker01   NotReady    <none>   10m   v1.18.5
enduranceworker02   NotReady    <none>   8m    v1.18.5
The final piece is the Pod network addon. There are a few options available here. Weave has consistently worked for me on the Pis without any actions, so we will be using this.
On the master node, run
kubectl apply -f "https://cloud.weave.works/k8s/net?k8s-version=$(kubectl version | base64 | tr -d '\n')"
Now wait for all the pods to come up - this might take a bit of time. You can keep an eye on it with:
watch kubectl get pods --all-namespaces
You should see a weave-net-* pod for each node. And finally, after a bit of wait, all nodes should be ready:
pi@endurancemaster01:~/ $ kubectl get node
NAME                STATUS   ROLES    AGE   VERSION
endurancemaster01   Ready    master   26m   v1.18.5
enduranceworker01   Ready    <none>   21m   v1.18.5
enduranceworker02   Ready    <none>   19m   v1.18.5
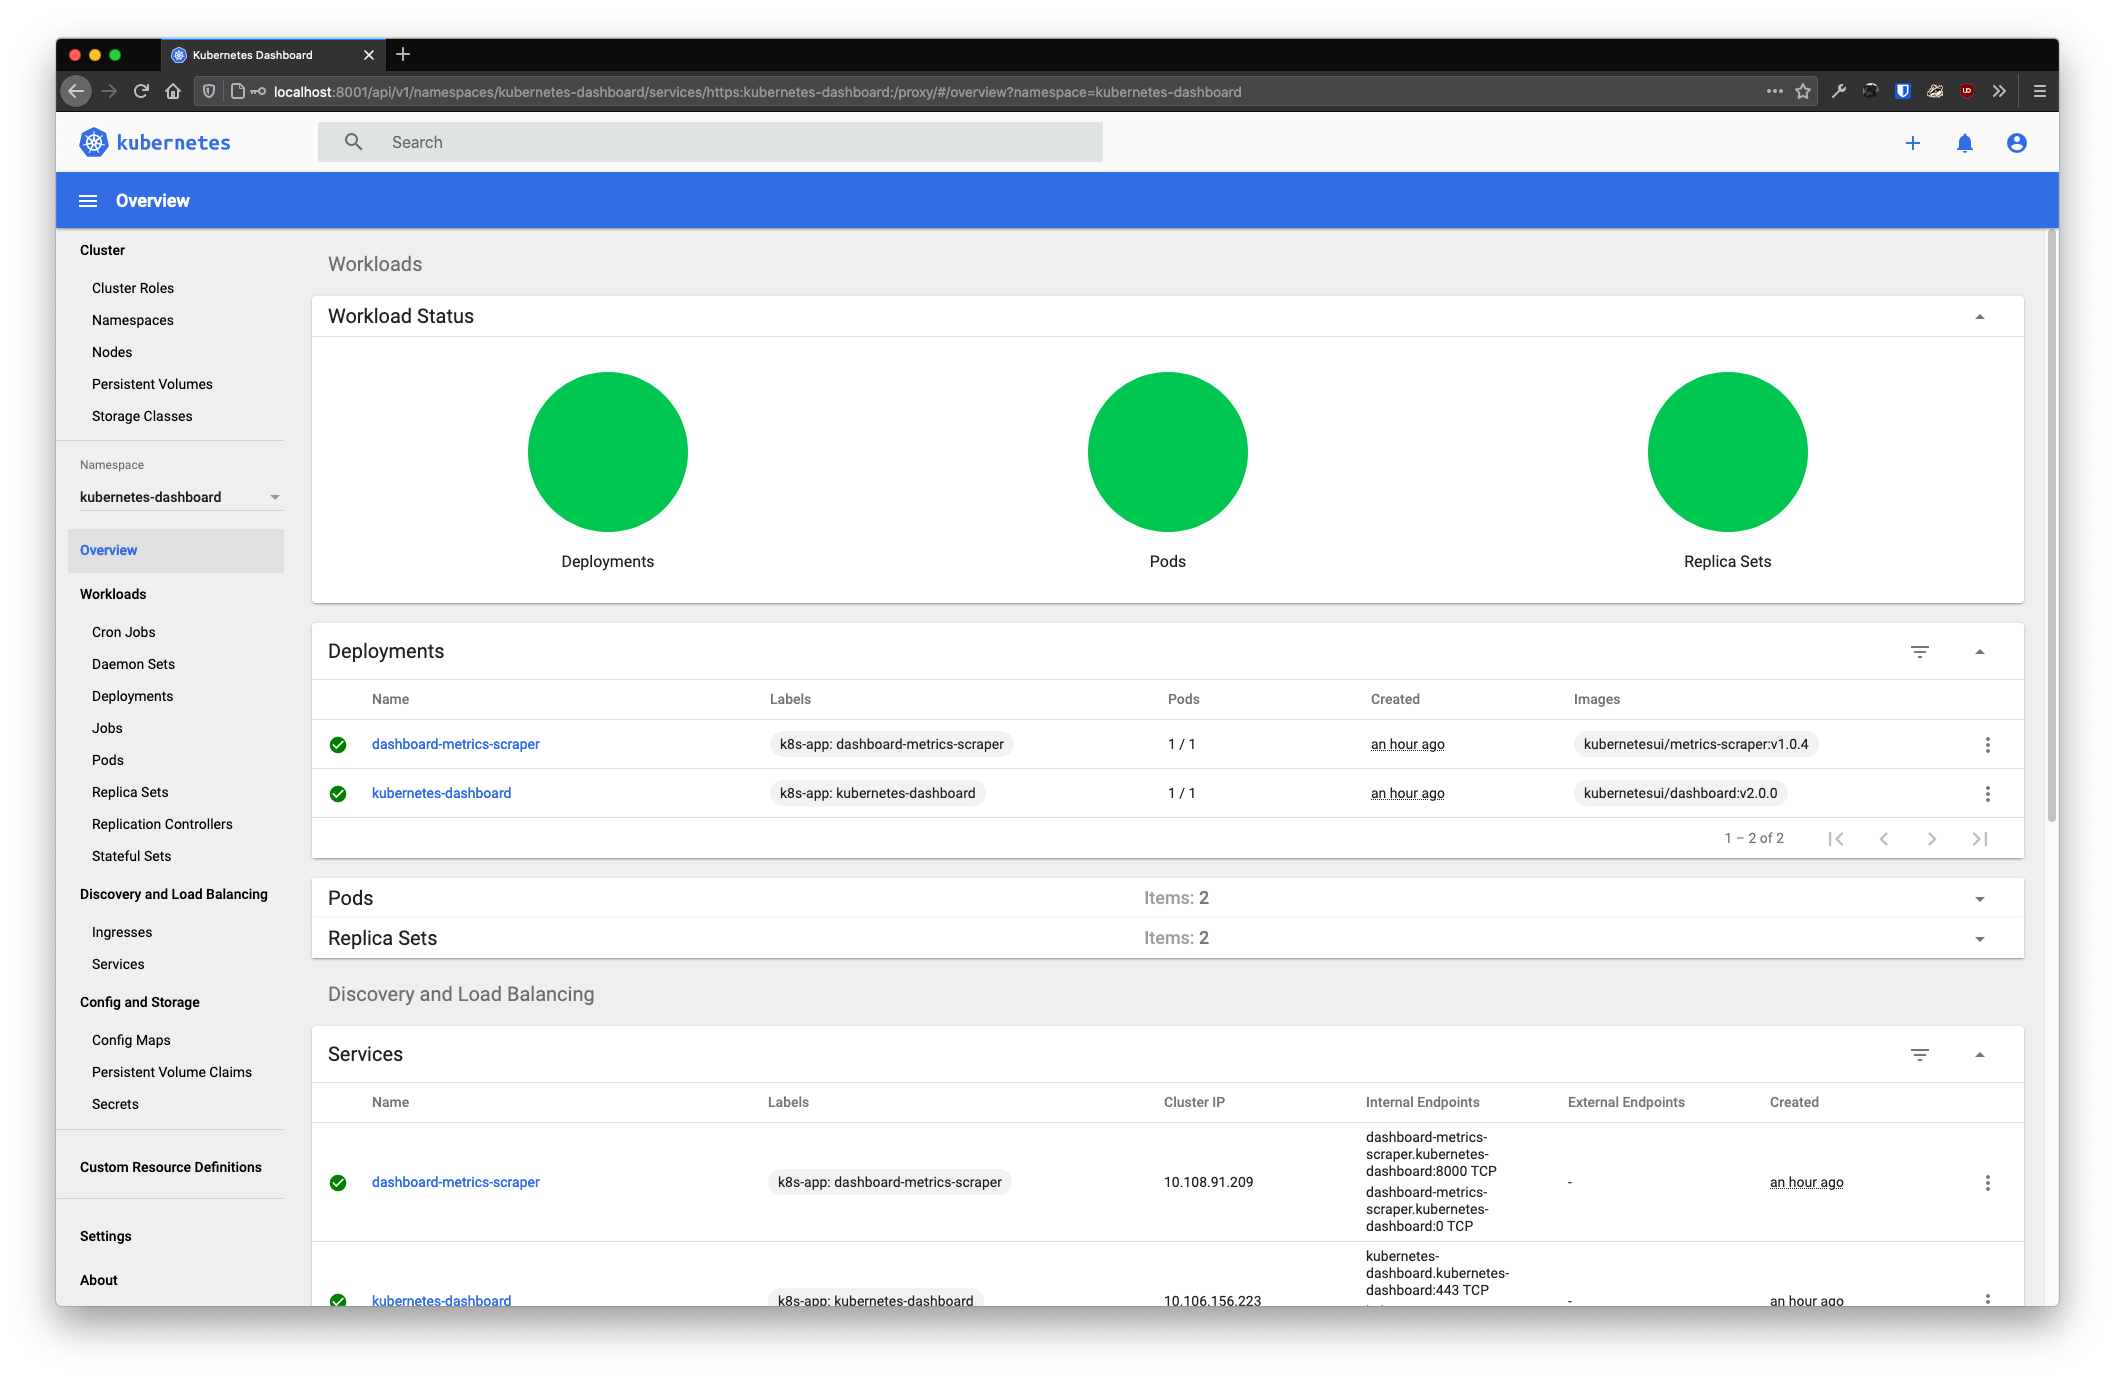
Install Dashboard
With the cluster running, let’s deploy the Kubernetes Dashboard to it. Fortunately, this is pretty simple these days (see the docs). Run:
kubectl apply -f https://raw.githubusercontent.com/kubernetes/dashboard/v2.0.0/aio/deploy/recommended.yaml
After deploying the dashboard, create a user that we can use to login - see readme here.
Once the admin-user service account is created, get a token:
kubectl -n kubernetes-dashboard describe secret $(kubectl -n kubernetes-dashboard get secret | grep admin-user | awk '{print $1}')
Assuming you set up kubectl on your local machine, open a proxy:
kubectl proxy
Dashboard is now available at http://localhost:8001/api/v1/namespaces/kubernetes-dashboard/services/https:kubernetes-dashboard:/proxy/. Log in with the token from the previous output and you should now see your new cluster in all its glory: