
Recently, Visual Studio Team Services (VSTS) opened up the ability to make extensions with distribution through the Visual Studio Marketplace (https://marketplace.visualstudio.com). The marketplace and API is currently in preview, but I will show how easy it is to create an extension with some of the currently available features.
Extensions are made using HTML, CSS and JavaScript. You may also choose to go with TypeScript. The official documentation is also heavy on using TypeScript, so help is available either way. The official tool for packaging and managing extensions is written using Node.js and distributed via NPM. Why is all of this great? It means you can create extensions regardless of what platform you are sitting on (OS X, Windows, Linux).
Example: A Work Item Watch Dog
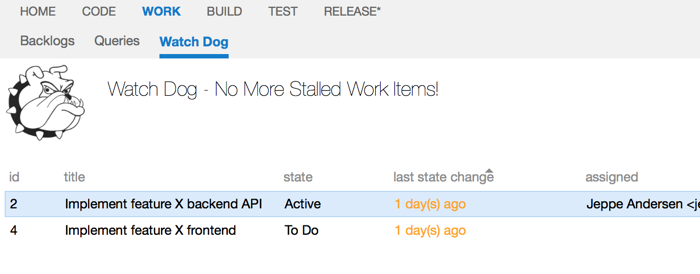
The extension we will will make is a “Watch Dog” that will list open work items and highlight those which have not made any progress for some time, indicated by lack of change in the state field. When supported by the API, it could also notify members. It will be created as a “Hub”, meaning it is a standalone web page hosted in an iframe. The following is how the extension will look when we are done:
We will touch upon the following in order to create the extension:
- Use of the Core Javascript SDK to get context information about the project
- Use of the REST API to retrieve work items
- Use of the grid UI control to list the work items
- Package and publish the extension for testing in the marketplace and adding it to your own account
I will go with pure JavaScript in this article, but it should not be difficult to translate it to TypeScript. The full example is available on GitHub.
Creating an Extension
The first step is to get the SDK. It is available on GitHub - create an empty folder for the extension, download the VSS.SDK.js and place it in a scripts subfolder scripts.
Next, create an index.html file that will host the extension. Add the following to the html file:
 <!DOCTYPE html>
 <html xmlns="http://www.w3.org/1999/xhtml">
 <head>
     <title>Task Watch Dog</title>
     <script src="scripts/VSS.SDK.js"></script>
 </head>
 <body>
     <!-- Content goes here -->

     <script type="text/javascript">
         VSS.init({
             explicitNotifyLoaded: true,
             usePlatformScripts: true,
             usePlatformStyles: true
         });

         VSS.notifyLoadSucceeded();
     </script>
 </body>
 </html>
VSS.init() is used to perform an initial handshake/setup with the host window. We can provide options as input to this function - we use explicitNotifyLoaded to indicate that we will notify the host manually when the extension is done loading. This is used for the loading indicator. VSS.notifyLoadSucceeded() is called later to indicate that the extension is loaded. In general it is good to perform this yourself if you are doing any async/promise work, as we will for this extension. There is also a notifyLoadFailed function, in case you want to fail the execution of your extension.
usePlatformScripts let’s you use common libraries included in the host (e.g. jQuery will be made accessible to you).
usePlatformStyles let’s you use the host CSS styles.
Access Project Information with Core SDK
For our extension, we will need to know which project the user is currently working with, to restrict the query for stalled work items to that project only. To get this information we use Core Client SDK. Extend the JS code in the script tag to the following:
VSS.init({
    explicitNotifyLoaded: true,
    usePlatformScripts: true,
    usePlatformStyles: true
});

var projectId = VSS.getWebContext().project.id;

VSS.notifyLoadSucceeded();
getWebContext() retrieves a WebContext, which contains numerous information about the context in which the extension is running. In this case we use it to extract the project id. With the project id we can move forward and use the REST API to make a query for work items belonging to that project.
Retrieving Work Items with a REST client
Apart from the Core SDK, we can get REST clients that abstracts away working with the different areas of VSTS (e.g. Work Items, Tests, Build, Git, TFVC). We will use the “Work Item Tracking Http Client”.
Extend the JS code to the following:
VSS.init({
    explicitNotifyLoaded: true,
    usePlatformScripts: true,
    usePlatformStyles: true
});

VSS.require(["VSS/Service", "TFS/WorkItemTracking/RestClient"],
        function (VSS_Service, TFS_Wit_WebApi) {

    var projectId = VSS.getWebContext().project.id;

    // Retrieves the Work Item Tracking REST client
    var witClient =
        VSS_Service.getCollectionClient(TFS_Wit_WebApi.WorkItemTrackingHttpClient);

    VSS.notifyLoadSucceeded();
});
The Work Item Tracking API allows us to retrieve, update and create work items. We will use the following two functions for this extension:
queryByWiql(..)- queries for work items using the Work Item Query Language (WIQL)getWorkItems(..)- retrieves work items with selected fields based using id’s
Extend the JS code to use the work item client for querying all work items that are open:
VSS.init({
    explicitNotifyLoaded: true,
    usePlatformScripts: true,
    usePlatformStyles: true
});

VSS.require(["VSS/Service", "TFS/WorkItemTracking/RestClient"],
        function (VSS_Service, TFS_Wit_WebApi) {

    var projectId = VSS.getWebContext().project.id;

    // Retrieves the Work Item Tracking REST client
    var witClient =
        VSS_Service.getCollectionClient(TFS_Wit_WebApi.WorkItemTrackingHttpClient);

    var query = {
        query: "SELECT [System.Id] FROM WorkItem WHERE [System.State] NOT IN ('Closed','Completed','Resolved','Removed', 'Done')"
    };

    // Executes the WIQL query against the active project
    witClient.queryByWiql(query, projectId).then(
        function(result) {
            // We now have the id's of all work items that are open

            // notifyLoadSucceeded is called after the REST call is finished
            VSS.notifyLoadSucceeded();
        });
});
queryByWiql(..) returns a JSON result that looks as follows:
{
    "queryType": "flat",
    "queryResultType": "workItem",
    "asOf": "2015-12-26T16:53:40.07Z",
    "columns": [
        {
            "referenceName": "System.Id",
            "name": "ID",
            "url": "https://[xx].visualstudio.com/DefaultCollection/_apis/wit/fields/System.Id"
        }
    ],
    "workItems": [
        {
            "id": 2,
            "url": "https://[xx].visualstudio.com/DefaultCollection/_apis/wit/workItems/2"
        },
        {
            "id": 4,
            "url": "https://[xx].visualstudio.com/DefaultCollection/_apis/wit/workItems/4"
        }
    ]
}
In this example, we have work items with id 2 and 4 that are open - we map these to an array and use getWorkItems(..) to get the fields we are interested in for these work items:
VSS.init({
    explicitNotifyLoaded: true,
    usePlatformScripts: true,
    usePlatformStyles: true
});

VSS.require(["VSS/Service", "TFS/WorkItemTracking/RestClient"],
    function (VSS_Service, TFS_Wit_WebApi) {

        var projectId = VSS.getWebContext().project.id;

        // Retrieves the Work Item Tracking REST client
        var witClient =
            VSS_Service.getCollectionClient(TFS_Wit_WebApi.WorkItemTrackingHttpClient);

        var query = {
            query: "SELECT [System.Id] FROM WorkItem WHERE [System.State] NOT IN ('Closed','Completed','Resolved','Removed', 'Done')"
        };

        // Executes the WIQL query in the active project
        witClient.queryByWiql(query, projectId).then(
            function (result) {

                // Generate an array of all open work item ID's
                var openWorkItems = result.workItems.map(function (wi) { return wi.id });

                var fields = [
                    "System.Title",
                    "System.State",
                    "Microsoft.VSTS.Common.StateChangeDate",
                    "System.AssignedTo"];

                witClient.getWorkItems(openWorkItems, fields).then(
                        function (workItems) {
                            // Access the work items and their field values

                            VSS.notifyLoadSucceeded();
                        });
            });
});
Here is an example response from getWorkItems(..):
{
    "count": 2,
    "value": [{
        "id": 2,
        "rev": 3,
        "fields": {
            "System.State": "Active",
            "System.AssignedTo": "Jeppe Andersen",
            "System.Title": "Implement feature X backend API",
            "Microsoft.VSTS.Common.StateChangeDate": "2015-12-24T10:42:07.28Z"
        },
        "url": "https://[xx].visualstudio.com/DefaultCollection/_apis/wit/workItems/2"
    }, {
        "id": 4,
        "rev": 5,
        "fields": {
            "System.State": "To Do",
            "System.Title": "Implement feature X frontend",
            "Microsoft.VSTS.Common.StateChangeDate": "2015-12-24T12:04:07.623Z"
        },
        "url": "https://[xx].visualstudio.com/DefaultCollection/_apis/wit/workItems/4"
    }
    ]
}
Working with the Grid UI Control
With data about open work items in our hands, let’s put it to use. The VSTS SDK provides some out-of-the-box UI controls that will provide some good functionality as well as blend in well with the rest of the service. The Grid is one of them, used to display data from a source.
First, add a div to act as a container on the page for the Grid:
<div id="grid-container" style="width: 100%; height: 100%;"></div>
Next we add two new modules to use - The general UI Controls module and the Grid control module. Extend the JS code to the following (note that I have omitted some of the previous for clarity - check the full version on GitHub:
VSS.require(
    ["VSS/Service", "TFS/WorkItemTracking/RestClient", "VSS/Controls", "VSS/Controls/Grids"],
    function (VSS_Service, TFS_Wit_WebApi, Controls, Grids) {

..

var container = document.getElementById("grid-container");

..

witClient.getWorkItems(openWorkItems, fields).then(
    function (workItems) {

        // We now have the open work items with field values, time to display these
        var options = {
            width: "100%",
            height: "500px",
            // Maps each work item to a flat array with column values
            source: workItems.map(function (w) {
                return [
                    w.id,
                    w.fields["System.Title"],
                    w.fields["System.State"],
                    w.fields["Microsoft.VSTS.Common.StateChangeDate"],
                    w.fields["System.AssignedTo"]];
            }),
            columns: [
                { text: "id", index: 0, width: 50 },
                { text: "title", index: 1, width: 200 },
                { text: "state", index: 2, width: 100 },
                {
                    text: "last state change",
                    index: 3,
                    width: 175,
                    getCellContents: function (
                        rowInfo,
                        dataIndex,
                        expandedState,
                        level,
                        column,
                        indentIndex,
                        columnOrder) {

                        // Calculates the difference between current time and
                        // StateChangeDate field value in days
                        var oneDay = 24 * 60 * 60 * 1000;
                        var today = new Date();
                        var changeDate =
                            new Date(this.getColumnValue(dataIndex, column.index));
                        var diffDays =
                            Math.round(Math.abs((changeDate.getTime() - today.getTime()) / (oneDay)));

                        // If more than 4 days has passed, show in orange
                        // If more than 10 days has passed, show in red
                        return $("<div class='grid-cell'/>")
                            .width(column.width || 100)
                            .css("color", diffDays < 4 ? "black" : (diffDays < 10 ? "orange" : "red"))
                            .text(diffDays + " day(s) ago");
                    }
                },
                { text: "assigned", index: 4, width: 250 }
            ]
        };

        var grid = Controls.create(Grids.Grid, container, options);
        VSS.notifyLoadSucceeded();
      });
    ..
});
Packaging and Publishing the Extension
Finally, it is time to package and publish the extension to the market place so we can test it in a VSTS account. See the official documentation for additional information on this part.
Go to the Visual Studio Marketplace Management and create a new publisher. You will need an ID and a display name.
Install the command line tools (TFX) using NPM by issuing the command npm i -g tfx-cli (you need Node.js installed for this to work). Test that it works by issuing the command tfx.
We are now ready to make it a real extension. Add a manifest file to the directory which is a JSON file that declares what your extension is, description for the marketplace, what kind of permissions it needs and so on. You can name it anything, but calling it vss-extension.json let’s you omit inputting an explicit file name when working with the TFX CLI.
See the official documentation for details about what you can (and must) declare in the manifest file.
You can see the one for this extension on GitHub. Most of it should be self explanatory. A couple of properties deserves some explanation.
"contributions": [
        {
            "id": "TaskWatcher",
            "type": "ms.vss-web.hub",
            "description": "Adds Watch Dog to the Work hub group",
            "targets": [
                "ms.vss-work-web.work-hub-group"
            ],
            "properties": {
                "name": "Watch Dog",
                "order": 99,
                "uri": "index.html"
            }
        }
    ],
The contributions section is where we declare how our extension plugs in to the existing experience. In this case we add a hub to the existing work hub, by adding a link to our index.html page.
"scopes": [
    "vso.work"
]
The scopes section is where permissions needed are declared. The extension needs access to read the Work Items. Note that once you have declared this scopes section and uploaded your extension, it is final! You will not be able to change this later as it is right now.
Now, open a terminal and cd to the extension folder. Issue the command tfx extension create, or tfx extension create --manifest-globs=[file].json if you saved the manifest as a different name than vss-extension.json. The TFX CLI will create a .VSIX file in the folder.
Go to the Visual Studio Marketplace Management and hit the Upload new extension button to upload the .VSIX file. You should now see the extension being listed:

Your extension is now on the marketplace, but not publicly available. We can easily add make it available for one or more accounts to test.
Testing a Private Extension
In the marketplace management portal, hit the Share button to share it with your account for internal testing. You will be prompted to enter your account name (name.visualstudio.com).
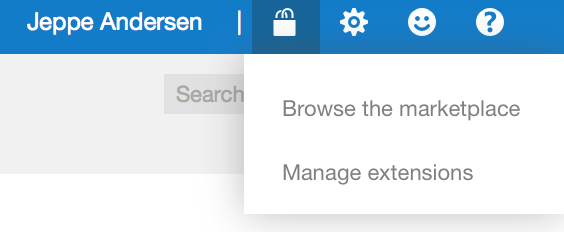
Once shared, go to your account and in the upper right corner you can access the extensions. Click “Manage Extensions”.
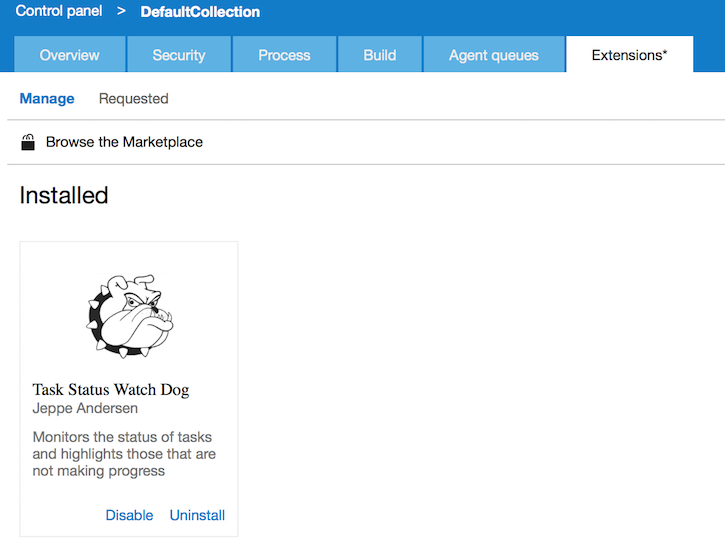
On the extensions page in the control panel, you should see the extension listed. Click on it to activate it in the account and you will be taken through the necessary steps.
And that is it! Navigate to a project, go to the Work hub and you should now be able to access the extension.
